1 RedisCluster简介
Redis继推出支持Lua脚本之后又一重大改进——RedisCluster,从此再也不用客户端自己实现一致性哈希或者使用Twemproxy来实现伪集群了。现在的redis最新版本为3.0.0,还处于beta测试阶段,将会在年底推出稳定版。
Redis 集群使用数据分片(sharding)而非一致性哈希(consistency hashing)来实现:一个Redis 集群包
含16384 个哈希槽(hash slot),数据库中的每个键都属于这16384 个哈希槽的其中一个,集群使用公式
CRC16(key) % 16384 来计算键key 属于哪个槽,其中CRC16(key) 语句用于计算键key 的CRC16 校验和。
2 RedisCluster的优点和缺点
一般一个事务的优点和缺点都是放在最后作为总结,不过在这里直接先给出rediscluster的优点和缺点,显得直观:
优点:
缺点:
3 RedisCluste架构
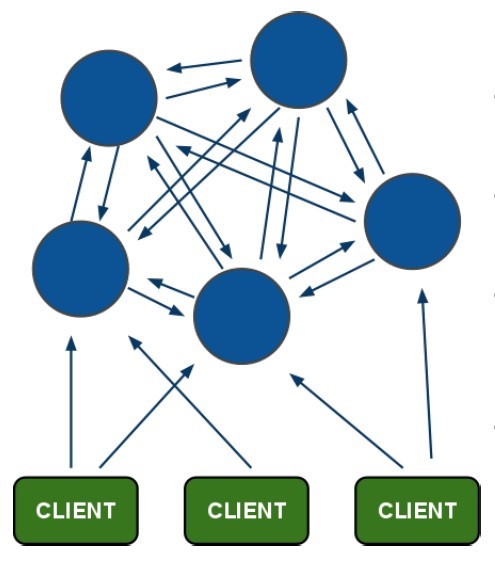
3.1 RedisCluster架构图
架构细节:
(1)所有的redis节点彼此互联(PING-PONG机制),内部使用二进制协议优化传输速度和带宽.
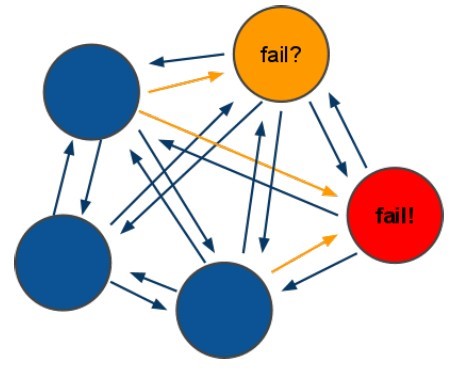
3.2 RedisCluste选举:容错
(1)整个选举过程是集群中所有master参与,如果半数以上master节点与master节点通信超过(cluster-node-timeout),认为当前master节点挂掉.
a:如果集群任意master挂掉,且当前master没有slave.集群进入fail状态,也可以理解成集群的slot映射[0-16383]不完成时进入fail状态.<br>
b:如果集群超过半数以上master挂掉,无论是否有slave集群进入fail状态.<br>
ps:当集群不可用时,所有对集群的操作做都不可用,收到((error) CLUSTERDOWN The cluster is down)错误
4 安装redis软件包和相应的依赖
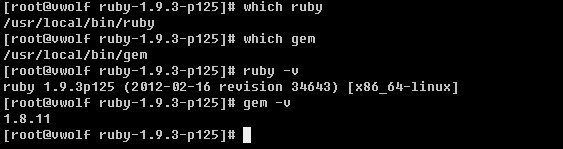
4.1 安装ruby依赖
1
2
3
4
5
6
7
8
9
10
11
12
1. 下载源码, http://www.ruby-lang.org/en/news/2012/02/16/ruby-1-9-3-p125-is-released/ <br>
2. 下载yaml-0.1.4.tar.gz, http://pyyaml.org/wiki/LibYAML <br>
3. 解压libyaml,然后编译安装, <br>
./configure
make
make install
ldconfig
4. 解压ruby,然后编译安装即可:
./configure
make
make install
5. 检查是否ok
4.2 安装连接redis的ruby客户端程序gem-redis
连接redis的ruby客户端程序,集群命令都依赖于包中的ruby脚本。
1
2
3
4
5
6
7
在线安装:
gem install redis –version 3.1.0
离线安装:
下载地址:
http://rubygems.org/gems/redis/versions/3.1.0
安装命令:
gem install –l ./redis-3.1.0.gem
4.3 安装Redis-3.0.0程序
1
2
3
tar -zxvf redis-3.0.0-rc1.tar.gz
cd redis-3.0.0-rc1
make
5 搭建集群
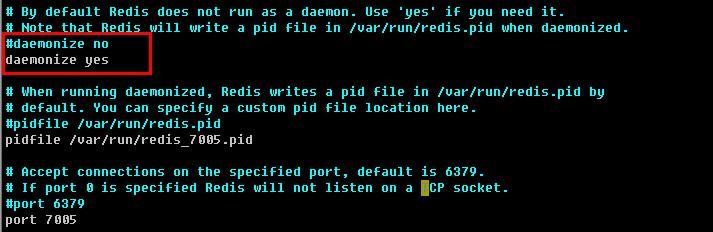
默认情况下redis实例是不开启集群模式的,必须手动修改一下配置文件,打开集群的设置之后配置文件关于集群的那一部分如下所示:
1
2
3
4
5
port 7000
cluster-enabled yes
cluster-config-file nodes.conf
cluster-node-timeout 5000
appendonly yes
其中nodes.conf是在实例启动的时候自动创建,并在需要的时候自动更新,无需人为创建。
5.1 在rediscluster目录下创建bin目录
把安装目录下面的srv目录下的文件复制到bin里面一份,如下所示:
5.2 在rediscluster目录下创建7000 7001 7002 7003 7004 7005目录
目录名称表示端口号,代表不同的实例,然后在每个目录下面都复制一份redis-server和redis.conf
切换到7000目录:
5.3 把redis改成以daemon形式启动
默认情况下redis是以非daemon形式启动的,这里把它改成以daemon方式启动,只需修改下配置文件即可:
5.4 依次启动所有的实例
启动实例的命令:
1
2
3
4
5
6
/data0/dashan/rediscluster/7000/redis-server /data0/dashan/rediscluster/7000/redis.conf
/data0/dashan/rediscluster/7001/redis-server /data0/dashan/rediscluster/7001/redis.conf
/data0/dashan/rediscluster/7002/redis-server /data0/dashan/rediscluster/7002/redis.conf
/data0/dashan/rediscluster/7003/redis-server /data0/dashan/rediscluster/7003/redis.conf
/data0/dashan/rediscluster/7004/redis-server /data0/dashan/rediscluster/7004/redis.conf
/data0/dashan/rediscluster/7005/redis-server /data0/dashan/rediscluster/7005/redis.conf
在10.75.22.202上7002端口被占用,故新增一个端口7006
1
/data0/dashan/rediscluster/7006/redis-server /data0/dashan/rediscluster/7006/redis.conf
实例运行情况:
5.5 构建redis集群
上面6个redis实例是相互独立的,彼此之间互不影响,可以把它们看为单个redis节点,或者把他们看作是6个小集群,每个集群里面只有一个节点,现在要把它们关联到一块。
1
2
3
4
5
6
7
8
9
10
11
12
13
14
15
16
17
18
19
20
21
22
23
24
25
26
27
28
29
30
31
32
33
34
35
36
37
38
39
40
41
42
43
44
45
46
47
48
49
50
51
52
53
[root@vwolf 7006]# /data0/dashan/rediscluster/bin/redis-trib.rb create --replicas 1 10.75.22.202:7000 10.75.22.202:7001 10.75.22.202:7003 10.75.22.202:7004 10.75.22.202:7005 10.75.22.202:7006
>>> Creating cluster
Connecting to node 10.75.22.202:7000: OK
Connecting to node 10.75.22.202:7001: OK
Connecting to node 10.75.22.202:7003: OK
Connecting to node 10.75.22.202:7004: OK
Connecting to node 10.75.22.202:7005: OK
Connecting to node 10.75.22.202:7006: OK
>>> Performing hash slots allocation on 6 nodes...
Using 3 masters:
10.75.22.202:7000
10.75.22.202:7001
10.75.22.202:7003
Adding replica 10.75.22.202:7004 to 10.75.22.202:7000
Adding replica 10.75.22.202:7005 to 10.75.22.202:7001
Adding replica 10.75.22.202:7006 to 10.75.22.202:7003
M: 150be26a9a3508663f6751f229df000e0103e4ad 10.75.22.202:7000
   slots:0-5460 (5461 slots) master
M: 1e2bcb961eeeb4653b3df242b7c4eccd476d9216 10.75.22.202:7001
   slots:5461-10922 (5462 slots) master
M: 4b9858e2cc3b1c788ce91a057db5c5ec5447109f 10.75.22.202:7003
   slots:10923-16383 (5461 slots) master
S: d4bbd493d9a060f6dfa36c3426a9b6568cf85ea2 10.75.22.202:7004
   replicates 150be26a9a3508663f6751f229df000e0103e4ad
S: 00abe61bcee514e6c3e8babb061862f178b20082 10.75.22.202:7005
   replicates 1e2bcb961eeeb4653b3df242b7c4eccd476d9216
S: 76f2a2eb73504d631cd79e7264887e22b69c994c 10.75.22.202:7006
   replicates 4b9858e2cc3b1c788ce91a057db5c5ec5447109f
Can I set the above configuration? (type 'yes' to accept): yes
>>> Nodes configuration updated
>>> Assign a different config epoch to each node
>>> Sending CLUSTER MEET messages to join the cluster
Waiting for the cluster to join......
>>> Performing Cluster Check (using node 10.75.22.202:7000)
M: 150be26a9a3508663f6751f229df000e0103e4ad 10.75.22.202:7000
   slots:0-5460 (5461 slots) master
M: 1e2bcb961eeeb4653b3df242b7c4eccd476d9216 10.75.22.202:7001
   slots:5461-10922 (5462 slots) master
M: 4b9858e2cc3b1c788ce91a057db5c5ec5447109f 10.75.22.202:7003
   slots:10923-16383 (5461 slots) master
M: d4bbd493d9a060f6dfa36c3426a9b6568cf85ea2 10.75.22.202:7004
   slots: (0 slots) master
   replicates 150be26a9a3508663f6751f229df000e0103e4ad
M: 00abe61bcee514e6c3e8babb061862f178b20082 10.75.22.202:7005
   slots: (0 slots) master
   replicates 1e2bcb961eeeb4653b3df242b7c4eccd476d9216
M: 76f2a2eb73504d631cd79e7264887e22b69c994c 10.75.22.202:7006
   slots: (0 slots) master
   replicates 4b9858e2cc3b1c788ce91a057db5c5ec5447109f
[OK] All nodes agree about slots configuration.
>>> Check for open slots...
>>> Check slots coverage...
[OK] All 16384 slots covered.
总共6个实例,前面三个是主库,后面三个是从库,对于rediscluster,最少要有3个主库,这些都是在redis-trib.rb程序里面写死的,感兴趣的可以看一下源码。
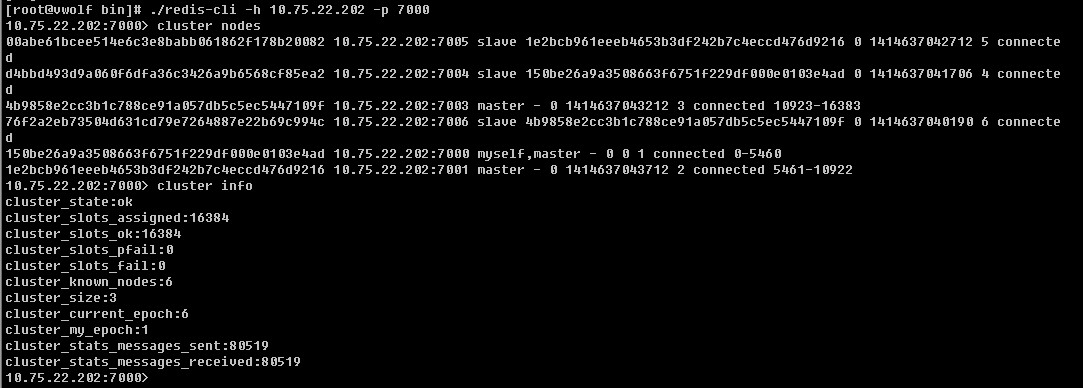
现在集群算是构建完成了,可以查看当前集群状态:
连上集群后执行cluster nodes和cluster info命令,对于redis集群,只要连接上一个实例,相当于整个集群就已经连接上了。
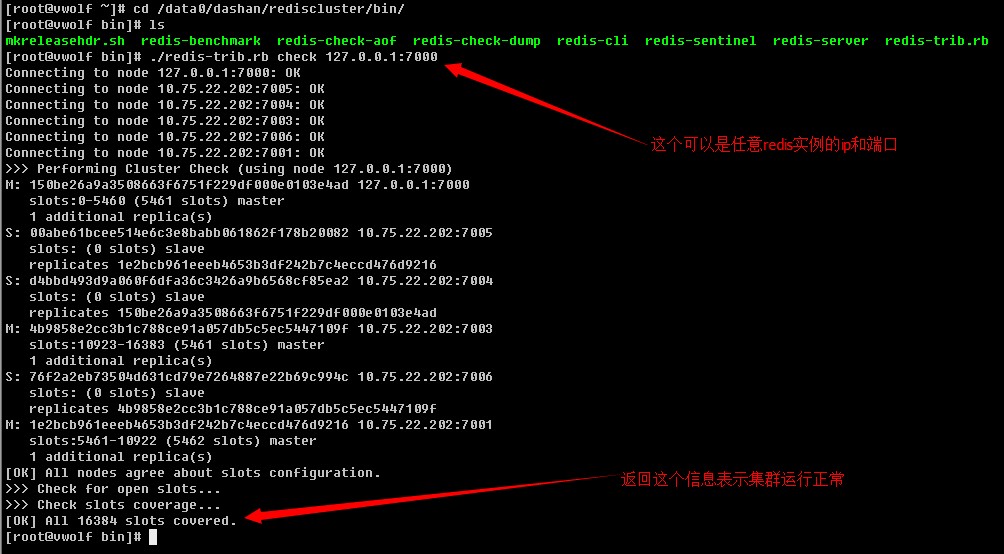
5.6 检查集群状态
调用redis-trib.rb的check子命令
5.7 连接集群的客户端
1
2
3
4
5
6
7
8
9
10
11
12
现在支持redis集群的客户端还比较少,现在搜集到的有下面这样:
支持ruby的客户端:
https://github.com/antirez/redis-rb-cluster
支持python的客户端:
https://github.com/Grokzen/redis-py-cluster
支持java的客户端:
https://github.com/xetorthio/jedis
支持C#/.NET/VB的客户端:
https://github.com/StackExchange/StackExchange.Redis
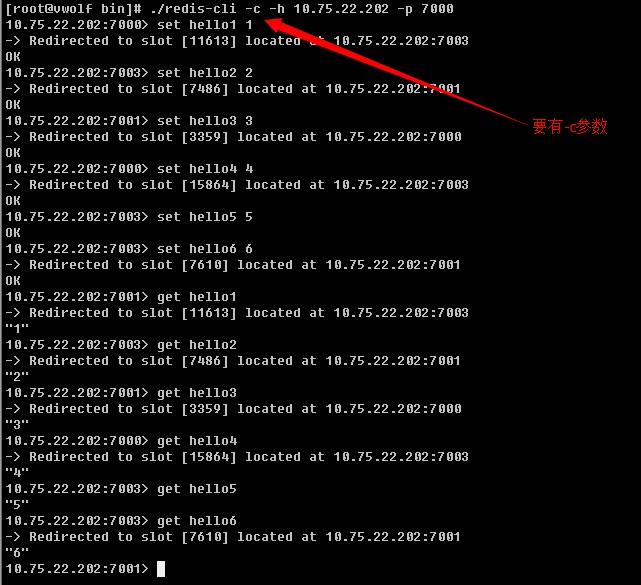
命令行连接集群的方法:
在原来的基础上添加-c参数,如下所示:
redis-cli –c –h 10.75.22.202 –p 7000
再次强调,对于集群连接,只要连接上集群中任意一个实例即可,因为集群中各个实例是相互关联的,所以相当于连接上整个集群。
6 集群常用操作
6.1 集群相关命令
1
2
3
4
5
6
7
8
9
10
11
12
13
14
15
16
17
18
19
20
21
22
23
24
25
26
redis集群相关命令:
节点
CLUSTER MEET <ip> <port> 将 ip 和 port
所指定的节点添加到集群当中,让它成为集群的一份子。
CLUSTER FORGET <node_id> 从集群中移除 node_id 指定的节点。
CLUSTER REPLICATE <node_id> 将当前节点设置为 node_id 指定的节点的从节点。
CLUSTER SAVECONFIG 将节点的配置文件保存到硬盘里面。
槽(slot)
CLUSTER ADDSLOTS <slot> [slot ...]
将一个或多个槽(slot)指派(assign)给当前节点。
CLUSTER DELSLOTS <slot> [slot ...] 移除一个或多个槽对当前节点的指派。
CLUSTER FLUSHSLOTS
移除指派给当前节点的所有槽,让当前节点变成一个没有指派任何槽的节点。
CLUSTER SETSLOT <slot> NODE <node_id> 将槽 slot 指派给 node_id
指定的节点,如果槽已经指派给另一个节点,那么先让另一个节点删除该槽>,
然后再进行指派。
CLUSTER SETSLOT <slot> MIGRATING <node_id> 将本节点的槽 slot 迁移到 node_id
指定的节点中。
CLUSTER SETSLOT <slot> IMPORTING <node_id> 从 node_id 指定的节点中导入槽 slot
到本节点。
CLUSTER SETSLOT <slot> STABLE 取消对槽 slot
的导入(import)或者迁移(migrate)。
键
CLUSTER KEYSLOT <key> 计算键 key 应该被放置在哪个槽上。
CLUSTER COUNTKEYSINSLOT <slot> 返回槽 slot 目前包含的键值对数量。
CLUSTER GETKEYSINSLOT <slot> <count> 返回 count 个 slot 槽中的键。
6.2 在命令行操作rediscluster
集群连接上之后对它进行set或get操作,会根据key的值把它分布到不同的实例上面,具体分布方法为:
CRC16(key) % 16384
执行set或get操作时如果key分布到其他实例上,会自动Redirected过去,如下所示:
6.3 使用连接rediscluster的ruby客户端往rediscluster里面灌一批数据
执行ruby ./example.rb命令
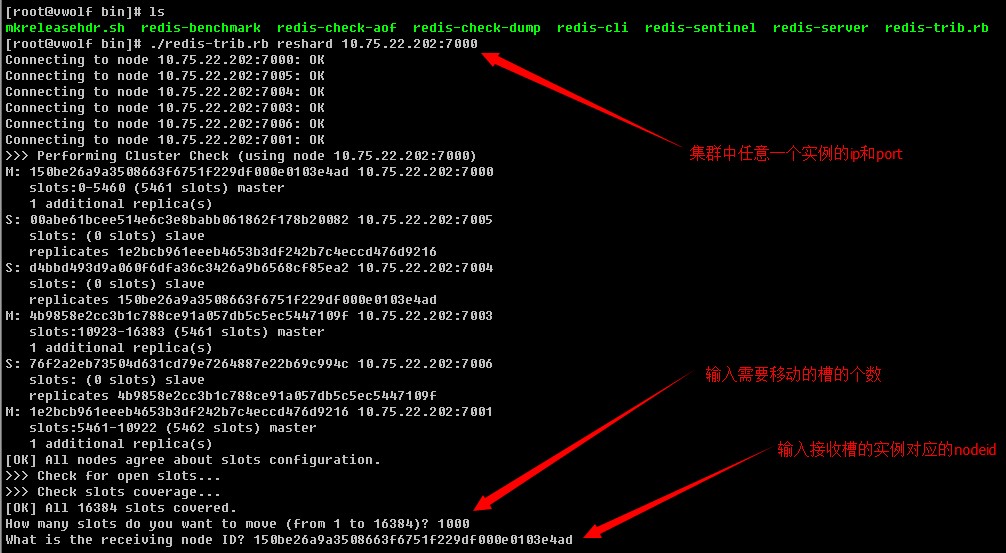
6.4 在线分片操作
1
# ./redis-trib.rb reshard 127.0.0.1:7000
你只需要指定集群中其中一个节点的地址,redis-trib.rb 就会自动找到集群中的其他节点。
依次输入需要移动的槽的个数,接收槽的redis实例对应的nodeid,这些槽的来源,如果来自其他所有的实例,这里输入all,如果来自个别实例,这里输入实例对应的nodeid,然后输入done.
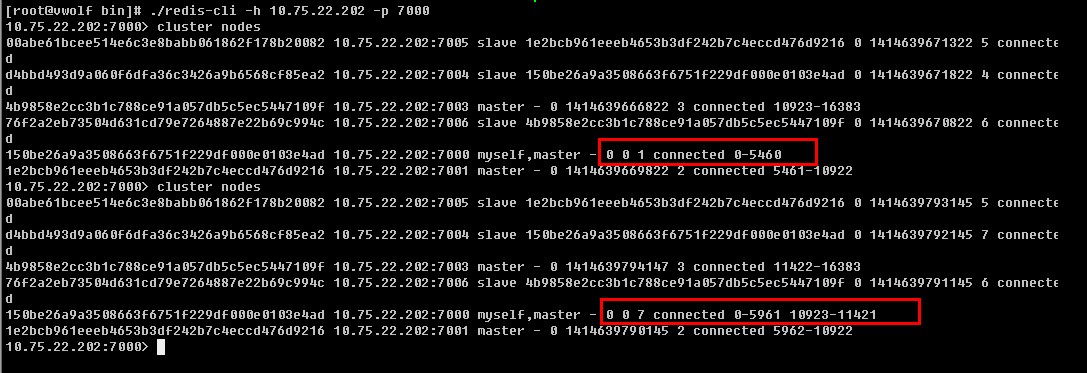
在线分片完成后可看到7000实例前后对比情况,如下所示:
6.5 添加master节点
首先像其他实例一样,分好端口和配置,把节点启动起来,以10.75.22.202:7007为例
然后使用redis-trib.rb程序,参数为add-node
1
./redis-trib.rb add-node 10.75.22.202:7007 10.75.22.202:7000
10.75.22.202:7007表示刚才启起来的节点
10.75.22.202:7000表示集群中任意一个实例
新节点添加完成后里面并没有数据,因为没有为新节点分配槽数,分配方法类似于上面的“在线分片”操作。
1
2
3
4
5
6
7
8
9
10
11
12
13
14
15
16
17
18
19
20
21
22
23
redis-trib.rb reshard 10.75.22.202:7000
#根据提示选择要迁移的slot数量(ps:这里选择1000)
How many slots do you want to move (from 1 to 16384)? 1000
#选择要接受这些slot的node-id
What is the receiving node ID? 150be26a9a3508663f6751f229df000e0103e4ad
#选择slot来源:
#all表示从所有的master重新分配,
#或者数据要提取slot的master节点id,最后用done结束
Please enter all the source node IDs.
Type 'all' to use all the nodes as source nodes for the hash slots.
Type 'done' once you entered all the source nodes IDs.
Source node #1:all
#打印被移动的slot后,输入yes开始移动slot以及对应的数据.
#Do you want to proceed with the proposed reshard plan (yes/no)? yes
#结束
6.6 添加slave节点
其他类似,命令改成下面改样:
./redis-trib.rb add-node --slave 10.75.22.202:7007 10.75.22.202:7000
执行成功后,7007将作为7000的从库。
或者用另外一种方法:
新节点创建成功后,用redis-cli连接上新节点,然后执行下面的命令:
redis 10.75.22.202:7007> cluster replicate 150be26a9a3508663f6751f229df000e0103e4ad
其中150be26a9a3508663f6751f229df000e0103e4ad表示7000端口实例对应的nodeid,这样新建的7007实例将作为7000实例的从库。
6.7 删除一个slave节点
1
2
3
redis-trib.rb del-node ip:port nodeid
示例:
./redis-trib.rb del-node 10.75.22.202:7004 d4bbd493d9a060f6dfa36c3426a9b6568cf85ea2
6.8 删除一个master节点
1
2
3
4
5
6
7
8
9
10
11
12
13
14
15
16
17
删除master节点之前首先要使用reshard移除master的全部slot,然后再删除当前节点(目前只能把被删除master的slot迁移到一个节点上)
#把10.75.22.202:7001当前master迁移到10.75.22.202:7000上
redis-trib.rb reshard 10.75.22.202:7000
#根据提示选择要迁移的slot数量(ps:这里选择4960)
How many slots do you want to move (from 1 to 16384)? 4960(被删除master的所有slot数量)
#选择要接受这些slot的node-id(10.75.22.202:7000)
What is the receiving node ID? 150be26a9a3508663f6751f229df000e0103e4ad (ps:10.75.22.202:7000的node-id)
Please enter all the source node IDs.
Type 'all' to use all the nodes as source nodes for the hash slots.
Type 'done' once you entered all the source nodes IDs.
Source node #1:1e2bcb961eeeb4653b3df242b7c4eccd476d9216(被删除master的node-id)
Source node #2:done
#打印被移动的slot后,输入yes开始移动slot以及对应的数据.
#Do you want to proceed with the proposed reshard plan (yes/no)? yes

上述操作执行成功后,master节点上面已经没有数据了,这时候可以像删除slave节点一样删除master节点:
./redis-trib.rb del-node 10.75.22.202:7001 1e2bcb961eeeb4653b3df242b7c4eccd476d9216